
Introduction
Recently, it’s become apparent to me once more just how poor the state of operational security in the blockchain industry is. I want to say it’s surprising, but it’s really not at all, that developers are plagued by these poor practices as well. This has disastrous consequences for end users and even their own projects. A couple of examples include the biggest crypto hack of all time back in 2022 with $624M being lost. A more recent example is the WazirX hack from July this year with $235M lost. In an environment as harsh as this, where the average dev is being targeted by the best cybercriminals of a nation at all times, we need to be better.
With massive consequences like this, developers should take their OPSEC seriously. However, most don’t. Why? None of the developer education out there covers this topic. It’s only grizzled veterans that eventually land upon this information and sometimes when it’s too late. The little that does is either complicated or really long (due to nested, mandatory linked articles) and skipped over as a result.
Thus, I present yet another guide… we’re keeping things to the bare minimum needed to remain reasonably secure in this harsh environment. Please note that this is restricted to the operational security of your social media accounts, private keys, and machine. Maintaining anonymity or pseudonymity is a non-goal of this guide. Please see the Hitchhiker’s Guide to Online Anonymity for that.
It also needs to be noted that this is only individual due diligence. It is only strong if your colleagues are also following similar principles.
There are additional factors to be considered when applying OPSEC to an organization, especially given internal tooling may not be the same. If you’d like help designing convenient policies and beefing up your organization’s OPSEC, feel free to contact us to schedule a consultation.
Despite my intro, this guide is also suitable for non-devs. Instead of bombarding you with links to tools and resources, we’ve focused on giving explanations geared towards accessibility to everyone. However, where required, you will have to spend some time learning some skills.
Certain information will be repeated across different sections. Take it to heart. This isn’t intentional but think of it as spaced repetition.
Additionally, some of the material herein is terse in the interest of not making this too long. This is meant as an introduction. Readers are recommended to go beyond the depths of this guide and do their own guided research on topics given here to solidify understanding.
How to read this guide
Review this sanity checklist as you progress throughout the guide or use it as a reference for areas you need to brush up on or beef up.
If you are a technical reader, i.e., a developer, who is familiar with these concepts, you may skip the brief intro and justifications for each section and instead dive right into actionable steps.
We are currently in the process of creating a specialized NixOS VM that should simplify the following process and make it trivial to set up disposable VMs complete with essential tools like Foundry and Halmos on the fly. Stay tuned for that.
OPSEC procedure and steps
We can very simply define operational security as protecting critical information. Before we continue, we’ll walk through the steps of arriving at the necessity for these steps. Bear in mind that this guide is written with the threat model of devs handling considerable TVL at-risk in mind. Regardless, you should read this first, it details the mindset we should approach OPSEC with.
With that done, let’s continue:
-
Identify critical information:
- Private keys
- GitHub access tokens
- Passwords
- The data on your machine broadly
- Privileged accounts (i.e., project socials, GitHub with access to sensitive repos)
-
Analyze threats and their sophistication level:
- DPRK, that is North Korea’s Lazarus group
- Various independent cybercriminals
-
Analyze vulnerabilities and assess risks:
- You can take a look at our checklist for help with this
-
Apply countermeasures:
- We go into depth on this in the guide
Securing your machine
Virtual machines, isolation, and segmentation
Virtual machines can be thought of as computers within computers. They’re collections of files that are run by a hypervisor to simulate a virtual operating system within your host (main) OS. You can run operating systems different from your own this way as well. Nothing stops you from running Windows on macOS with this. Your host doesn’t use up all resources at once when running, and this is how we’re able to do this. The hypervisor utilizes the unused compute power to run these virtual computers.
They’ll allow us to make the rest of the OPSEC system as painless as possible as we can very easily set up a new virtual machine without needing to buy a separate workstation for segmentation of work and communications (beyond segmentation of your work and personal computer).
VM hypervisors feature a snapshot system allowing us to “roll back” the state of the “computer.” That is, return the computer to the state it was when a snapshot was taken. This is the closest we get to time travel currently. Everything from the set time in the VM to the applications installed, their state, and any open tabs will be exactly as it was.
We’ll be utilizing VM snapshots every time we suspect we’ve downloaded malware over the tricky process of trying to uninstall it given some viruses leave artifacts in places you wouldn’t expect and persist operations even after you “delete” them.
We’re also currently working on a NixOS configuration file complete with the essentials for smart contract development including Foundry, Hardhat, Slither, etc. This will make setup as painless as possible, especially for running disposable VMs.
If you’re a non-technical user or are just looking for something quick to run external/untrusted documents, this includes attachments received in emails, DMs, or any other sources, Windows has an in-built sandboxed VM. It’s impermanent and retains no data between sessions. Find out how to activate it here.
Setup
There are tons of guides out there on setting up virtual machines. Here’s one I recommend.
In this section, we’ll be documenting recommended settings for setup and focusing mainly on the very essential task of isolating the VM, that is making sure any malware that you may (accidentally, I hope) install doesn’t easily propagate.
Our main options for a personal hypervisor are going to be:
- VirtualBox, which is open source and entirely free
- VMware Fusion, which is free for personal use. Needs a license for work
As of the September VirtualBox release, it runs fine on Apple Silicon Macs. Previously, only VMware supported the new chipset.
Windows: Running Windows on a virtual machine is going to be a sub-optimal experience given just how resource-intensive the OS is unless you have plenty of resources to spare (i.e., at least 8 GB of RAM, ideally more, 200 GB storage, and 8 CPU cores). However, you can still manage it if you’re still dead set on it.
Linux: I personally recommend a user-friendly Linux distribution like Mint or Pop!_OS. The UI is intuitive and contrary to popular belief, you will only need to use the terminal when handling developer work most times. If you ever run into an issue, both of these distributions are well documented and a quick Google should suffice. They’re both relatively light. Allocating 4 GB of RAM and 80 GB of storage should be more than enough as a minimum. Since we’re gonna be using these machines relatively often, 200 GB should do.
Side note: Pop!_OS comes with full disk encryption right out of the box and both claim not to spy on you if you care about that sort of thing. You can go with either but Mint is known for having the most similar UI to Windows.
macOS: While it would be ideal for any Mac users seeking to replicate and segment their environment, official Apple sources only list older macOS images for download. It’s still possible to get the latest running on a hypervisor, the process is just more out of the way and out of scope for this guide.
Isolation
- Disable any shared folders between your host and guest (virtual machine). On VMware, you can find this under the “Sharing Settings” page.
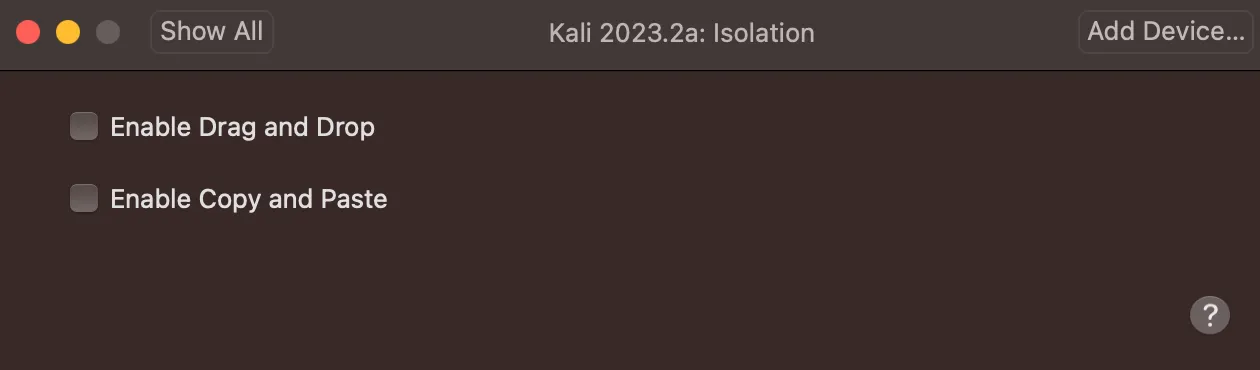
- Disable “drag and drop” and “copy paste” between host and guest. This is in “Isolation” under settings.
We’ll not touch network settings, however when the internet is not needed (i.e., in your development VM), disable the network adapter.
Recommended workflow:
-
It goes without saying but you should be using a separate computer for work. Restrict entertainment and anything other than work to your personal computer.
-
Set up a segmented, isolated VM for communications, that is, opening emails, social media, et cetera in case of malware infection.
-
Set up a second one for general development work following the same principles. Refrain from using this for anything other than development and version control updates. Keep applications light, sticking to:
- System binaries
- Your IDE and smart contract development kit
- Your wallet provider for deployments. Do not keep your private key in your
.envfiles. Remove them after deployment and only add them when needed. Stick to random keys for tests.
If you’re EVER going to be running or building untrusted code (i.e., code that isn’t from your organization), please set up a third one for this. This final VM should have limited accounts signed and no access to any important SSH keys and privileged GitHub tokens. Set up burner accounts for anything you’ll need to access here including but not limited to GitHub, email, et cetera.
If you’re a non-dev, you likely won’t be sent anything that requires you to run code in which case you should use a Windows Sandboxed VM to open untrusted/external files like PDFs you receive in unsolicited emails. I’d take it a step further and say you should do this even for solicited and trusted emails to avoid the assumption that all your colleagues have perfect security.
Full disk encryption
You absolutely should not be leaving your devices unattended anywhere and yet it happens anyway at crypto conferences. If you’ve ever been to one, the sight of an empty hall with plenty of unattended laptops is not so uncommon. Aside from this, more than a few people have been robbed while attending said conferences. Normally, that’d mean game over. Even if your devices are password protected, your hard drive likely isn’t and plenty of forensics techniques exist for extracting data off unencrypted hard drives. The implications are clear.
Additionally, usually cryptocurrency wallets store your passphrase and private keys in an encrypted file. However, it was previously possible to “bypass” this because Firefox and Chromium-based browsers save non-password fields to disk unencrypted as part of the “Restore Session” feature. However, given the specific constraints (i.e., remote/physical access to the machine and previous input of a passphrase when importing), this vulnerability was not really much of a threat.
In any case, to guard against such scenarios, it’s best to enable full disk encryption. This has different semantics and different things to consider for each OS so I’ve split them below.
Note on recovery keys: Store these in your password manager and physically as well on paper that is stored in a reasonably secure way. If you lose these, there is NO way to recover your data at all. It’s gone for good.
- macOS: Here, it’s done with FileVault. However, it’s important to mention that this is enabled by default for MacBooks with Apple Silicon and T2 security chips. If your MacBook doesn’t meet that criteria, you can manually enable FileVault with the instructions here.
- Windows: Most likely enabled by default. However, you can check to make sure with the instructions here.
A note on Find My iPhone and Mac
Be sure to enable both of these settings on their respective devices as they are not enabled by default on Apple devices. They allow you to be able to locate your missing Apple devices in case they’re stolen. It enables you to lock them with a message displayed for anyone who finds them.
Optionally, you can also erase the data on these devices if they are unrecoverable. (Be sure to enable backups!) This way, no one will be able to access any secrets on them such as your crypto wallet. You may think your passcode is enough security, however, there exists software that can brute force it.
Anyways, enable this setting by heading to settings. Tap on your profile. You should see this screen. (I’m using a Mac for this by the way but the process is the same for iPhone)
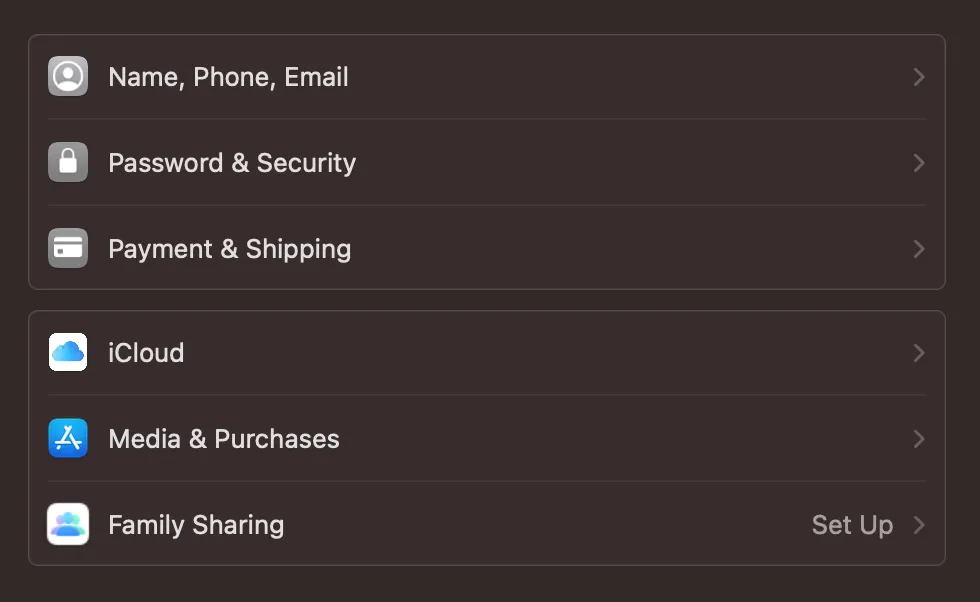
Tap on iCloud then show “Show All” on “Apps Using iCloud.” “Find My iPhone” and “Find My Mac” for their respective devices should be visible. Turn on all options.
Note: You may be concerned about your privacy with this setting but I assure you that Apple (or any other device) has ways of tracking your location beyond this. The benefits far outweigh the cons here.
A note on VPNs
If you’re ever using public or untrusted WiFi access points (i.e., the airport, a conference or hotel WiFi), be sure to use a VPN. This encrypts your data and ensures no one connected to the same network can read or modify the data your device sends to the router and eventually the internet. A lot of modern network protocols use encryption nowadays by default but this will ensure any that doesn’t is also covered. What about router encryption? If the router is not using WPA3, it doesn’t protect you from eavesdroppers connected to the same network.
Curious how this eavesdropping looks like? Read up on man-in-the-middle attacks and if you’re technical, look up Wireshark and DSniff.
Secure password setup and management
Let’s begin with anti-patterns for passwords. They will be explained later on in the guide:
- Generating passwords with only the default password policy on most sites
- Using less than 128 bits of entropy for master passwords such as for your wallets and password manager
- Generating non-diceware passwords
- Not relying on absolutely random sources like a word list for a diceware phrase password
- Not using a dedicated password manager
- Storing passwords in your browser. You know that little “Save password for this site?” feature? Avoid it. Instead use a dedicated password manager, the attack surface for them is much less than web browsers.
- Reusing passwords
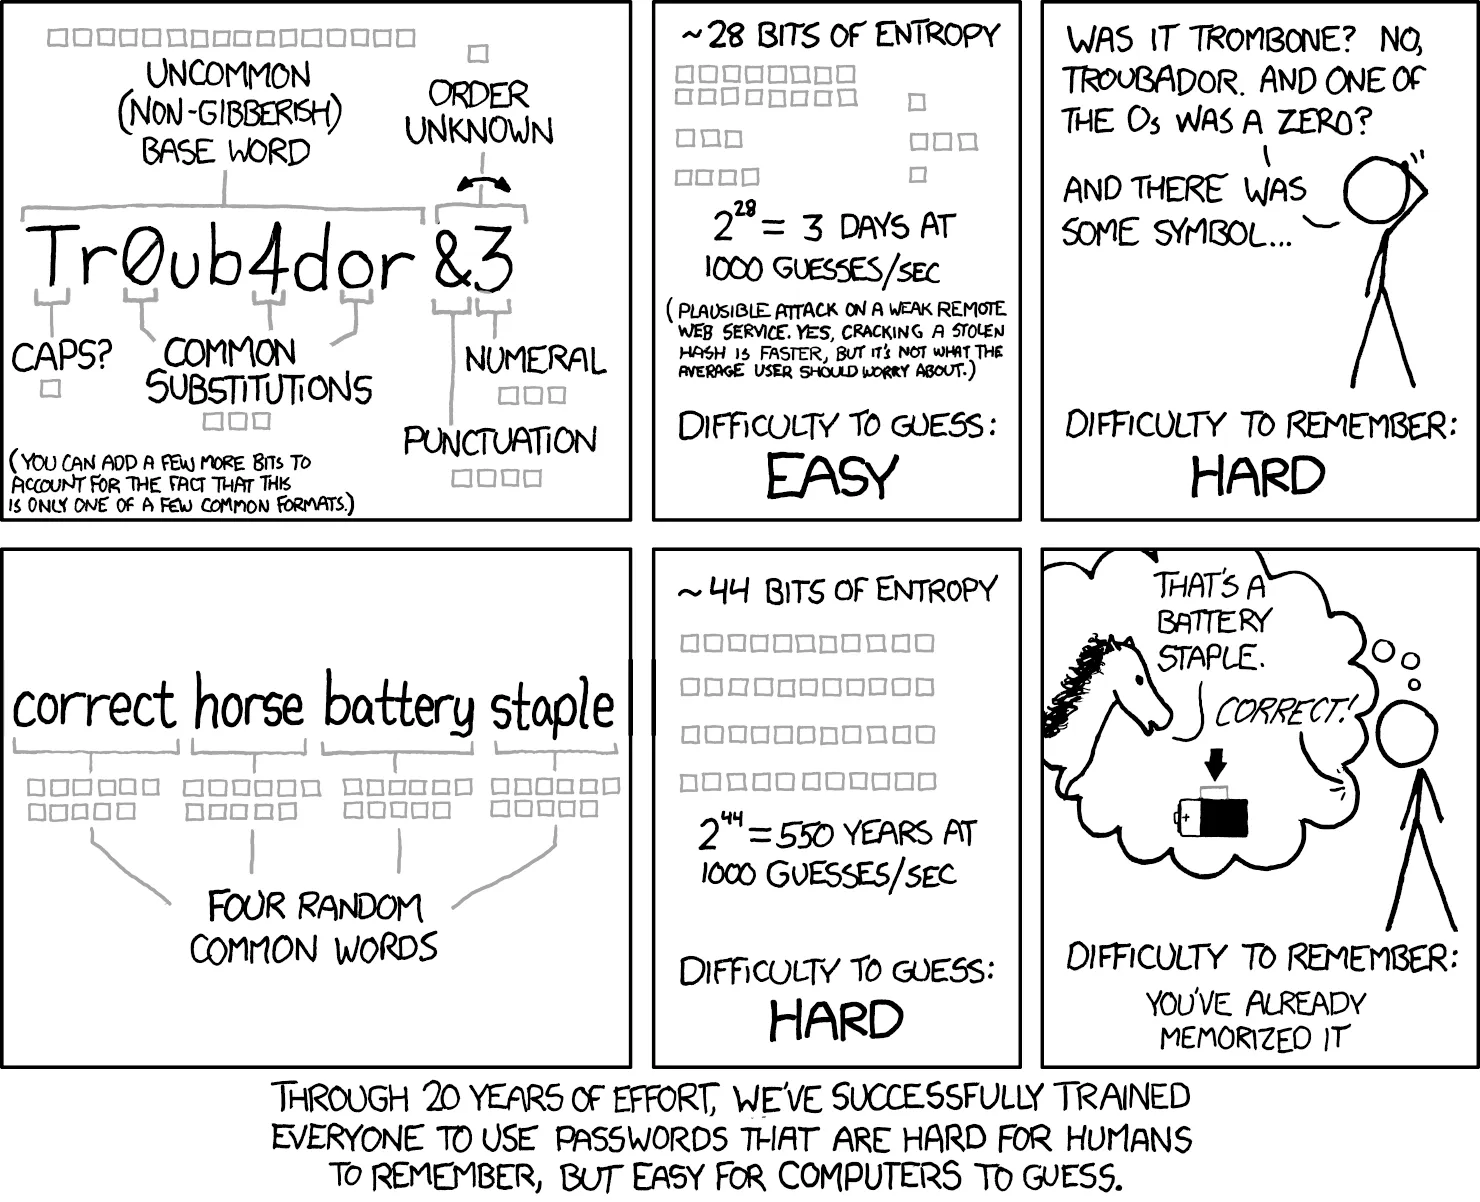
With that out of the way, let’s move on to secure password generation. This entire following section can be summarized with the below xkcd comic.
Given just how critical this step is, we will be covering this first. You are highly encouraged not to skip this section.
Passwords are typically generated with “something memorable but not easy to crack”, then mangled and padded (i.e., 50m3s3cUr3_p455w0rd, somesecure_password69). Recommendations are lines from songs, relatives’ and pets’ names plus birthdays in accordance with most sites’ compliance of a mix of upper and lowercase letters, numbers and characters, et cetera.
These have all been cracked. Don’t believe me? Let’s take a short detour to Hashmob.
Here are very short extracts from the hashes-org found list from 2021. The document is very large so just these will have to do. You can sate your curiosity by looking at Hashmob’s word lists.
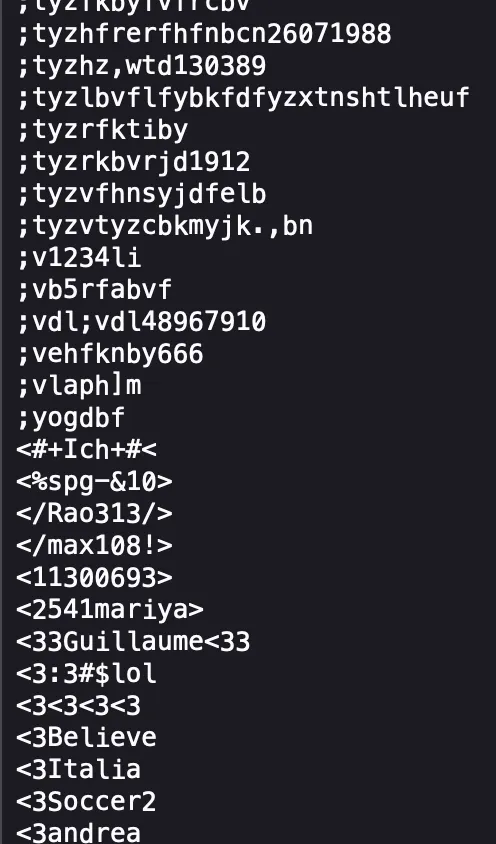
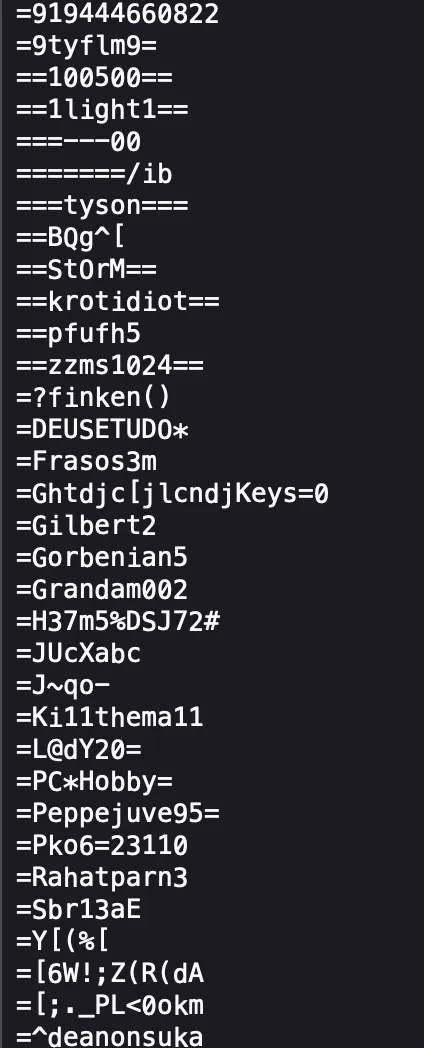
These passwords are cracked using techniques like dictionary attacks specifically rainbow tables and by brute-force attacks. If you are technical, please look at the hashcat wiki for more information.
Use of esoteric word(s) like “inveigled” or “vacillant” doesn’t make your password secure either. Wikipedia and by extension Wiktionary databases, classics books, and social media (yes, “sigmarizzler492” is not safe either) are used to seed attacks in modern techniques.
Ditch what you know about secure passwords. When it comes to password strength, entropy is king. This is a fancy term for randomness of data, measured in bits.
Let’s take a coin toss as an example. You’d only have to guess twice to cover all possible results. The entropy of this would be where 2 is the number of outcomes giving us 1 bit. Reversing this gives us the number of possible outcomes.
Fun fact: The entropy of shuffling a deck of cards is about 226 bits meaning there are (52 factorial) possible outcomes. 128 bits is the minimum strength for modern encryption schemes. For scale, the number of atoms in the universe is estimated at 272 bits.
Password strength is the product of its length and entropy per symbol used, i.e., . Symbol here could define a single character, word, number, or emoji. 128 bits is the minimum strength for modern encryption schemes so this should be safe to use.
The entropy per symbol depends on how large the set it belongs to is. A set of numbers 0-9 for example has 3.322 bits per symbol so you’d need a password of length ~41 to reach 128 bits of password strength. Increased set sizes (i.e., ASCII or Unicode) result in smaller password lengths.
| Set | Size | Entropy | Length | Password for 128-bit entropy |
|---|---|---|---|---|
| 0-9 | 10 | 3.322 | 41 | 34993953772747957922349524732952334547945 |
| ASCII printable | 95 | 6.570 | 29 | /{L^[<@y<219#\<@F{@, |
| Extended ASCII | 256 | 8.000 | 10 | æ°ìË«äþõÚæ |
| Phrase (English) | 7776 | 12.925 | 10 | automatic relapsing cursive amazingly thud payroll repackage foster headache skirt |
Most people have a tough time trying to recall symbols or 41 numbers. Memorizing a phrase is much easier as you can mentally associate between them. Thus we have random passwords that are easy to remember but with a high enough entropy that they are nearly impossible to crack.
This method is called diceware since originally you manually rolled five dice with the resulting 5-digit number corresponding to a single word in a wordlist. Nowadays, nearly all password managers come with diceware functionality.
Note: These phrases have to be random. Remember our earlier comments on Wikipedia and social media used to seed attacks? Turns out human psychology is predictable. Through a little elicitation (fancy term for getting to know you through innocuous conversation) even more information could be extracted to seed attacks (i.e., your mother’s maiden name, where you grew up, your favorite show, character, etc.).
It doesn’t matter what you use for your password (passphrase is more accurate here), as long it has enough bits for your risk appetite.
A shared WiFi password could be 80 bits. Sensitive secrets like a wallet password or the master key to a password manager should never be less than 128 bits.
Password managers
Phrases are much easier to remember than 10 esoteric characters while maintaining equivalent security. However, remembering more than one quickly becomes a difficult task.
You can’t reuse passwords to solve this problem as OPSEC failure, a phish, or some other data leak on a site with a shared password will lead to all of your accounts being broken into.
Some sites store their customers’ password data unencrypted or plaintext as it were. RockYou was one of them and its data breach in 2009 yielded a password database that is still used in seeding attacks today.
Another, more recent and scary incident was the breach of a data broker and background check company that leaked what’s estimated to be about 3 billion lines of data, including US social security numbers, phone numbers, email addresses, past and current physical addresses, and full names. It affected mainly US citizens and some from Canada and the UK. Worse still, it turns out the company had an official mirror where this data was published in plaintext.
You can’t save passwords in browsers either. They have too wide of an attack surface and are the first to be exposed and targeted by malicious code.
That leaves us with password managers.
Their features include:
- Sync across your devices
- Password auto-fill with browser extensions
- Encrypted password databases with modern schemes like AES256 bit
- In-built diceware password generators with configurable desired entropy and character sets like ASCII, extended ASCII, etc.
Now, there are many options for a password manager. We’ll list some popular ones below.
| Local | Cloud-based | Hybrid |
|---|---|---|
| KeePass | 1password | BitWarden |
| KeePassXC | LastPass | |
| ProtonPass |
Author’s note: I keep reading it as BitteWarten. :(
KeePass has a myriad number of forks like KeePassXC, which is open source. We will be covering KeePassXC. BitWarden (open source) is also recommended.
I prefer locally stored options because of incidents like the LastPass breach. You never know when a company will go belly up and take your data with it. That aside, both LastPass and 1password are not open source. If you ask any security professional, they will tell you how bad this is for a plethora of reasons. A main reason is it makes it a lot harder for white hats to review the code and submit goodwill fix recommendations.
Local options mean we’ll have to handle sync and backups ourselves. Losing our database is horrible for countless reasons, we can’t skip this step which is covered later.
KeePassXC setup and recommended settings
- Navigate to https://keepassxc.org and download the option for your OS.
- Verify the signature to ensure the integrity of the download. Refer to this forum post for instructions.
- If you prefer a video walkthrough, this one is recommended, though it doesn’t cover backup.
Note: Even if an attacker hijacked the KeePassXC website, they’d still need the developers’ PGP key to sign a fraudulent signature, ensuring we can always verify legitimate software.
-
Create a new database:
- Select ChaCha20 as the encryption algorithm (Google’s choice for Android, more modern than AES).
- Increase decryption time as desired (max is 5 seconds for added protection against quantum computing).
-
Choose a strong password of at least 90 bits:
- Physically write it down and store it safely (e.g., in a lockbox).
- Create a backup of this written password (store with a trusted person or in a bank).
-
Optional: Enable two-factor authentication with a YubiKey for added protection.
-
Configure security settings:
- Set the database to lock after 30 seconds of inactivity.
- Set it to lock when the application is minimized.
-
After setup:
- Migrate all existing accounts to the password manager.
- Generate new, secure passwords for these accounts using the built-in generator.
-
Set up auto-fill for longer passwords:
- Use browser integration.
- Look for the KeePassXC logo on websites with stored entries.
- Click the logo to trigger auto-fill.
Daily workflow
Generate strong, 90+ bit passwords from the extended ASCII set and adjust for website password requirements as needed.
Fill in the URL the credentials belong to for browser integration.
There’s a notes section where you should fill in answers to security questions.
Please write random answers for these to prevent attackers from making educated guesses after stalking your social media (i.e., for your mother’s maiden name set it as a randomly generated phrase).
Make multiple backups of your database to multiple locations daily or at least weekly. You can easily accomplish this with SyncThing.
Syncing
KeePassXC interfaces with KeePassDX for Android and Strongbox for iOS that import your database file.
Note we’ve only focused on covering the basics here. Please refer to the plethora of guides online expanding upon this topic. If managing a local password manager like this is too much for you, I encourage you to try out BitWarden or ProtonPass.
A note on ProtonPass and Bitwarden
ProtonPass is a newer cloud-only password manager from the same team that made ProtonMail. They have a freemium model, like BitWarden, that includes all the core features.
ProtonPass and Bitwarden may be easier to use for convenience if you don’t want to setup syncing for your own data. Additionally, it’s in the ecosystem of ProtonMail and ProtonVPN, so your account is the same for these services. Paying for the suite grants you premium access to all three.
A few features they include:
- Encrypted password share
- Password manager database imports and migration
- Browser integration via extension
- AES 256-bit encryption of vaults
- In-built two-factor authentication (Not recommended. Stick to Google Authenticator)
- ProtonPass specifically has a feature that informs you of any data breaches involving your accounts ensuring you can quickly take action and change any leaked passwords.
- It also integrates an email aliasing service to hide your actual email. Learn more about the relevancy of this in the email section of hardening contact paths
- The Sentinel feature watches for suspicious login attempts to your account and keeps logs which you can access and self-audit. Read all about it here.
ProtonPass doesn’t display the bits of entropy it’s generated passwords possess. However, we tested them with an entropy calculator and even the defaults (5 words and 20 characters) are sufficient, that is 128 bits or more. If you’re paranoid, you can adjust the strength even more by increasing the character and word length making it take even longer to crack on standard systems.
Bitwarden has an account recovery feature for business accounts so that may be useful for organizations wishing to enforce password manager use.
Wallet security
I will assume you’re using MetaMask in which case the default options are secure enough. Just make sure to backup your secret recovery phrase in a safe place. Written on acid-free (for long-term storage), laminated paper in a fire-proof lockbox with a backup in the bank will do. You may also keep it in your password manager assuming it is securely setup with a strong master password.
If using with desktop, your wallet application should be stored on a machine that is not used for entertainment or communications and if possible, disconnected from the internet when not signing transactions to minimize the chance of you getting phished or installing malware.
For a mobile device, you should be reasonably safe if you stick to official sources for installing applications and follow the usual procedures to keep safe from phishing.
Most people recommend that you stick to mobile and hardware wallets to sign transactions. This is because most drainer sites are usually janky on mobile.
Note that hardware wallets aren’t as secure as marketed:
- The small screens could obfuscate crucial information about the transactions you’re signing.
- You still need a secure computer anyway as custom malware can be built to infect any hardware wallets upon connection for tx signing.
- They can be backdoored and aren’t invulnerable to “EvilMaid” attacks despite claims otherwise by the Ledger team.
- If stolen, a sophisticated and motivated hacker can still recover your crypto without knowledge of your PIN or private key.
Be sure to revoke any approvals immediately after use. Under no circumstances should you leave unlimited approvals active. Use https://revoke.cash/ if your wallet doesn’t have in-built approval revoking capabilities.
Setting up a personal multi-sig wallet
Wallets are a bit of an anomaly compared to other “trad” accounts given they don’t have a default two-factor authentication method. We can skirt around this limitation with a personal multi-sig wallet. I’ll preface this with the fact that this is framed as an optional but highly recommended step. Multi-sigs are more gas intensive for everyday use. This shouldn’t be a problem on L2s though.
Sending off a multi-sig transaction is not a quick process, this ensures you’ll have time to review and re-review any transactions thus spotting anything suspicious. Additionally, it should help make the signing process harder if you ever try to YOLO sign things at 3 am while drunk.
We will be covering Gnosis Safe, now simply known as Safe{Wallet}, however, you can achieve similar results with Argent’s guardians feature. They have plenty of material on this on their website.
Our recommendation is to setup a 2/3 multi-sig. You can refer to the myriad tutorials out there for setting one up.
The reasoning behind this specific number is it’s still convenient enough that you will not go out of your way to avoid it while still being reasonably secure.
If someone somehow gained access to one key, they’d not be able to drain you. Since it’s a multi-sig it’s easy enough to switch out the compromised key.
One signing key should be on your desktop, another on your phone and a third device of your discretion. The third device should be one seldom used, acting as a backup.
Use different but reasonably secure wallet software for each key. We recommend MetaMask, Trust Wallet and Phantom given they are reasonably active in responding to security threats and development and are here for the long haul.
Private keys and secrets
Only add private keys to .env files when ready for mainnet deployment. Use dummy keys in all other cases. Remove them from the file immediately after.
Always ensure your .env file is added to .gitignore so it’s never pushed to your repo.
Apply the principle of least privilege for GitHub access tokens. Treat tokens with elevated access similar to your private keys.
Restrict OAuth access for external apps.
Phishing, social engineering, compromise and what to do about it
We’ll start with the basic best practices and say more later.
- Don’t click any suspicious links.
- Hover over embedded links like this with your mouse to preview where they’ll take you prior to clicking. On mobile you can do this by tapping and holding the link.
- Do not download files from untrusted sources.
- Do not RUN or OPEN files from untrusted sources.
- Review email addresses and website domain names thoroughly, cross-checking if they are legitimate.
- Do not plug in the “free USB drives” you got at a conference or any random USBs for that matter. Even if you find it on your desk. Ask first.
- Even something as simple as a charger. Bring your own. The importance cannot be understated. (S/O Hak5’s O.MG cable! See their rubber ducky for the USB drive version)
- If you absolutely MUST run anything from untrusted sources, do so in an isolated virtual machine environment sharing nothing with your main computer. Read more on this in the virtualization and segmentation section.
- Do not leave your computer unattended at a hackerhouse, conference or whatever.
- If possible, bring a device different from your work computer so nothing sensitive is affected in case of compromise.
Alright so, as is commonly known, humans are the weakest link in security especially as code security standards and quality steadily rise. Unfortunately, most organizations spend virtually zero effort on educating their personnel. Cybercriminals know this. In the near future, virtually all high-profile hacks will be as a result of social engineering on DPRK and other bad actors’ part. In fact, to scare you a little, you may have one in your company right now like this security company.
DPRK infiltration attempts are not new. See the thread in which Aztec interviews a North Korean operative.
To prevent getting phished, it’s extremely important to know what social engineering looks like. We’ll explore a few examples.
First, what is social engineering? Social engineering is defined as any act that influences a person to make a decision that may or may not be in their best interests. Social engineering exploits your emotions to influence decisions. Let’s look at a few phishing stories.
Linus from LinusTechTips recently got phished and locked out of his Twitter account. The story goes that he was at a barbecue cookout and received an email alert from “Twitter” about a login to his account from a new device.
He panicked and navigated to the linked site, inputting his login details. The key element here was fear backed up by similar graphics to a legitimate alert. It’s subtle but in addition to the engineered urgency, if you look at the graphic below that I pilfered from JohnHammond’s video, you see the location marked as somewhere in Russia. With their cybercrime reputation, it could’ve amplified any fears and urgency he felt:
Note: The biggest red flag is engineered urgency. You should keep your guard up when encountering it.

You can still see his shoulder in the corner of the screenshot from the video lmao. Inb4, “Hey, that’s my shoulder.” - the Deep.
Christopher Hadnagy shares a similar incident in his book. It’s been some years since I read it so I can’t recite it verbatim but as I remember it, there’s similar engineered panic, this time with Amazon.
It was right after a long day, his senses were dulled and he didn’t recognize the phishing attempt. Realization struck only after credentials were sent. Being educated on the subject as a social engineer himself, he immediately changed his password and contacted Amazon to let them know to watch for suspicious login attempts, successfully mitigating the incident.
The takeaway here is to keep a clear head when reading emails, especially those that try to elicit a strong emotion out of you, and verify their legitimacy.
Taylor Monahan, lead product manager at MetaMask and founder of MyEtherWallet has detailed threads showcasing phishing attempts by DPRK in crypto. Please read through them diligently to understand how they look like:
- Mega-thread of general phishing techniques employed by DPRK
- Extremely targeted spear-phishing example
- Phishing example targeting developers in particular
Here are a few essential steps to keep you safe:
- Use an adblocker like uBlock Origin to prevent malicious pop-ups and redirects that may land you on pages designed to phish you.
- Keep bookmarks of the legitimate domain names of sites you visit often (i.e., Twitter, Farcaster, Uniswap etc.).
- Verify any emails you receive against these bookmarks. A common technique is buying a domain name with the same name but a different top-level domain (i.e.,
https://uniswap.xyzinstead of.org). It’s also not uncommon for attackers to impersonate sites with a third and fourth level domain on a malicious site. It may look like thishttps://airdrop.uniswap.somedomain.org/. This appears legitimate but is fraudulent. Legitimate websites will always have their domain (uniswapin this case) directly before their top-level domain, (.orghere).https://uniswap.orgOther TLDs include.com,.net,.io, et cetera. - Avoid clicking on shortened URLs (i.e., bit.ly), they’ve been used to point towards malicious sites in the past. Use the Expand URL browser extension to see where they actually lead.
- Install the VirusTotal browser extension, read through the docs linked and right-click to scan any and all unfamiliar links including in emails. It also scans files to determine if they are malicious prior to download. It’s important to note that the results are shared publicly.
- Approach unsolicited messages with raised suspicion and vigilance, especially those with links attached.
- Verify that the sender is associated with whatever organization they claim to be from. Look them up on the company’s website. Check if the Twitter follows them. Search for the company independent of any attached links first as they may have false information on a phishing site designed to trick you. If the person claims to be someone you know, call them up personally outside of the attached message or verify on a different platform.
- Scan any links received this way with URLScan
- If you plan to navigate to these sites, do so with isolated browsing.
- If the links attached refer you to a page asking for credentials or other sensitive information like your authenticator codes, it may be a phish.
- Similarly, if they ask you to urgently make a monetary transaction, it may be a phish.
- Use different computers to segment communications and storage of secrets like SSH keys, crypto wallets, GitHub access tokens etc. Isolated virtual machines are great for this if you can’t get a separate machine. Refer to the section detailing them.
Here are a few browser extensions to help alert you to any phishing attempts. Please note that many of these are only available on the Chrome web store so you’ll need to switch browsers to either Chrome or other Chromium-based browsers like Brave if Google’s surveillance is a concern.
- Password Alert: official Google extension that alerts you whenever it detects you inputting your Google Account credentials in a malicious/phishing sign-in page.
- Kerberus Sentinel3: offers protection against address poisoning, scam detection via pop-ups, highlights likely fraudulent Twitter accounts and offers emergency alerts to events like a Ledger security vulnerability. Simulates transactions before they go through, offering you increased visibility into what happens should you sign them through Fire Wallet.
Phishing isn’t the only social engineering method that’ll be used against you. Another common one is elicitation. The goal isn’t to make you give up credentials, rather information. Here’s an extract from the FBI’s brochure on it:
Elicitation is a technique used to discreetly gather information. It is a conversation with a specific purpose: collect information that is not readily available and do so without raising suspicion that specific facts are being sought. It is usually non-threatening, easy to disguise, deniable, and effective. The conversation can be in person, over the phone, or in writing. Conducted by a skilled collector, elicitation will appear to be normal social or professional conversation. A person may never realize she was the target of elicitation or that she provided meaningful information.
The brochure presents the facts and techniques on elicitation far better than I can so I’ll skip over this section and refer you to their document.
On the topic of phishing, Google has excellent practice labs to help you learn and practice how to identify phishing attempts here.
There’s irony in the fact that the domain here could be cause for suspicion of phishing.
Please note the following down somewhere accessible as a sort of cheat-sheet.
If you believe you have been phished
- Remain calm. This is very important so as to not make any anxious mistakes. Take a few deep breaths and relax.
- Contact Seal 911 and pass on details of how it happened. If you have one, prefer your internal security team as SEAL members are volunteers. This may include:
- A screenshot of the perpetrating message or site where you leaked your credentials.
- Details of the sender.
- Details of any attached files. Do not forward the files themselves unless asked.
- Your wallet address. This is to monitor any funds outflow. If they ask you for your private key, passphrase or password that is not them.
- As you wait for further instruction, please change the passwords of affected accounts and ask the service’s team to monitor your account for suspicious login attempts.
- Ideally, you should be using a multi-sig wallet like Safe for your transactions with one key on your phone and another on your computer. In which case, generate a new signing key on a separate, isolated instance and switch it out for the one on the compromised machine.
- If you don’t have the above, generate a new wallet on a separate, isolated machine and transfer over your funds from the wallet on the compromised machine. Try to be quick.
- Document the entire process and forward it to your team.
- If you are a developer and had a multi-sig signer key, contact your team and switch it out.
Malware detection, monitoring and remediation
You shouldn’t ever be downloading and running random binaries off the internet. A lot of malware comes in the form of Excel files in emails, asking you to enable macros (a vector for code execution). Please never do this. Ideally, every untrusted file received over the internet should be run in an isolated, sandboxed virtual machine. Use common sense when doing this, you shouldn’t be running files that are clearly part of a phish attempt.
One of the most popular ways of malware distribution in web3 seems to be modded game clients, APKs (for Android) and binaries of “play2earn” games distributed to prospective degens for in-game monetary rewards via Telegram or Discord. An excuse for distribution in this manner may be “beta testing”, exclusive access or claims that the binaries are modded with cheats to help the victim accrue rewards faster or at an unfair advantage.
First, I’ll dispel the myth that using a specific OS makes you less vulnerable to malware. Motivated attackers will generate binaries for each architecture and OS out there. The fact that they know so many high-profile targets use Apple Silicon MacBooks nowadays pretty much guarantees that.
Malware developers are in possession of various techniques to evade or bypass your OS’s inbuilt protections and anti-virus so having these installed or enabled do not give you free reign to install random programs thinking you will be safe. You will get REKT.
That being said, a lot of malware shares similar techniques that can be flagged and give them away managing to evade anti-virus tools so we’ll detail those here.
macOS
For a dedicated anti-virus, Intego X9 comes highly rated, as does MalwareBytes. Please run those first with complete scans before moving on here.
Objective-See has lots of tools developed specifically for macOS. Please go through the list and read through their capabilities. Instructions are available on the site.
I will highlight a few below though:
- Reikey: helps detect keyloggers. I don’t need to say why this is helpful.
- Oversight: detects whenever your camera and mic are activated, helpful to stop malware that attempts to spy on you this way. You can configure an allow list for applications like Loom so you’re not spammed with alerts when recording something.
- BlockBlock: monitors whenever malware tries to install itself persistently (ensure it re-executes automatically in case of a system restart) and launches at login.
- KnockKnock: detects previously persistently installed software in the first place whereas the above monitors whenever an attempt is made.
- LuLu: an open-source firewall that blocks unknown outgoing connections (i.e., malware trying to listen for commands from the attackers’ machine) in addition to alerting you. You can configure it so already installed applications and system binaries are unaffected.
Windows
Please run the freeware Malicious Software Removal Tool first. It usually runs automatically once a month if you have Windows auto-update turned on. Additionally, install top-rated anti-virus software like BitDefender or MalwareBytes to work alongside Windows Defender.
Please note the following down somewhere accessible as a sort of cheat-sheet.
If you believe you’ve installed malware
For regular users
- Calm yourself. This is very important. So much has been lost to anxiety and fear.
- Contact Seal 911 and pass on details of how it happened. This may include:
- A screenshot of the perpetrating message or website where you believe you downloaded malicious software.
- Details of any relevant files. This may also be a GitHub repo. Do not forward the files themselves unless asked.
- Your wallet address. This is to monitor any funds outflow and suspicious activity. If they ask you for your private key, passphrase or password that is not them.
- If you know the exact program that infected you, rollback to a previous VM state. If not, continue the process below.
- As you wait for further instructions please run MSRT first in quick scan followed by a complete scan.
- Run your AV software in addition to the above.
- Follow recommended steps and delete the offending program completely. If you’re running a VM, rollback to a snapshot without the program, this way you know for sure that no artifacts are on your machine.
- Ideally, you should be using a multi-sig wallet like Safe for your transactions with one key on your phone and another on your computer. In which case, generate a new signing key on a separate, isolated instance and switch it out for the one on the compromised machine.
- If you don’t have the above, generate a new wallet on a separate, isolated machine and transfer over your funds from the wallet on the compromised machine. Try to be quick.
- Restart your computer.
For devs or other high value targets
What is meant by high value targets here? Individuals with access to custodial private keys hosted on cloud solutions or private keys belonging to privileged roles within a smart contract protocol.
- Do all of the above plus the following:
- Ideally, you should have an in-house incident response team where you can report this to verify if it’s not a false positive. If not, SEAL can help but please recognize that they are volunteers.
- If you have any external vendors especially if you’re storing custodial private keys with them on something like AWS, contact them and let them know of the situation, change your passwords.
- Wipe your drive. Yes, I’m serious. It’s too risky to do otherwise. You should have backups. If you have another machine, lock the compromised one down. That is, disconnect it from the internet and shut it down then hand it over to an expert for forensics.
These are very rudimentary steps. You need a more robust incident response plan and that is out of the scope of this document. Please contact your security provider for advice in setting one up for your organization’s specific needs. We offer this service along with incident response at Plainshift. Don’t hesitate to reach out here.
If you’ve been hacked or phished and a significant amount of funds have been egressed, consider hiring experts to track down the perpetrators: Both CFInvestigators and Naxo Labs come recommended.
Multi-factor authentication
Multi-factor authentication involves something the user knows (i.e., a password), something the user has (security token from an authenticator app or SMS or FIDO device like YubiKey), or something the user is (biometrics). The most common are the first two. Ideally, it’d be all three.
SMS should be avoided for this authentication. More on why below. Instead substitute it for security tokens from an authenticator app. Google Authenticator is great for most users and battle-tested. Authy has suffered breaches in the past.
Experts consider a FIDO hardware device/key to be the ultimate option. YubiKeys are considered the best in the market. Get your hands on one as soon as you can and set it up. It’s harder to get phished this way. You should have another as a backup given that if you lose your YubiKey or it’s stolen. That’s it.
Note: Most, if not all, applications do not have MFA set up by default. If it is, it’s with SMS. Please set it up manually every time you sign up for a new account anywhere. These settings can usually be found in the “Privacy and Security” section. If you’re having trouble thinking of accounts to start securing, here’s a short list:
- All your social media applications.
- Github.
- Your google account.
- Your email account, assuming you don’t use the above for this.
Preventing SIM swapping
SIM swapping, for its relative simplicity on the attackers’ side, has become a popular tool in the cybercriminal’s toolbox in recent years. Let’s dissect how it works.
When your phone is stolen, you need a SIM upgrade or are changing carriers, you can contact your carrier so you can keep your phone number on the new SIM. This process is called mobile number portability.
Some carriers handle this process without enough verification. The attacker will contact your carrier and social engineer them into porting your phone number to a SIM under their control.
They use personal information in this process to validate or back up their request. This info is recovered from data breaches online, directly from you through seemingly innocuous conversation, a spearphish or even your social media accounts. These may be your address, email address, date of birth, full name, social security number (remember the leak?) et cetera.
Since the operator on the other line has never heard your voice prior and with all this information, the port goes through more often than it doesn’t.
With how easy this takeover is, SMS is still the default multi-factor authentication method for countless applications. This extends to account recovery and ‘forgot password’ operations. You could be locked out of all your accounts without even knowing it.
To prove my point, if you don’t have MFA on anything other than SMS set up, please log out of your Twitter account and open a new private tab then attempt to get back in assuming you don’t know the password but have access to your phone number only. See how easy that was?
So how do we protect ourselves against this?
As previously mentioned, avoid SMS as a 2FA method. However, there are cases where it’s unavoidable. Contact your carrier and implement additional authentication for porting. These may include specifying physical, face-to-face authentication backed by identity documents and other vendor (US) specific instructions linked below:
Hardening social media and contact paths
Telegram
Due to recent developments, we collectively may want to move to an alternative like Signal. I will split the sections into titles with the names of the settings you’ll need to navigate to. Find them by tapping your profile picture.
Privacy and Security
Restrict visibility of both your phone number and birthday. For the former, if you’re a high-value target, attackers could find your Telegram account and linked phone number and SIM-swap you. We covered further protection for SIM swapping above but security is all about slowing attackers down. Not everyone needs to know your phone number.
For the latter, birthdays are often account recovery questions.
If you are in a position where it would not make sense to have people contact you unsolicited (i.e., you are not a dev, BD, salesperson, VC investor et cetera) then consider disabling DMs to prevent receiving potential scam and phishing attempts.
The rest of the settings in this tab are under your discretion.
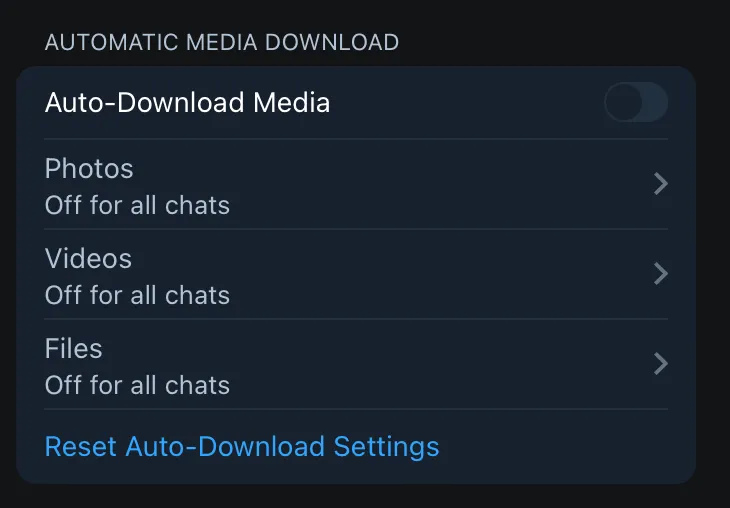
Data and Storage
Turn off auto-download media. Files automatically downloaded from public GCs or random DMs may be malware that’ll run upon an open out of curiosity, perhaps when organizing files. This may seem unlikely but earlier this year videos were used to hide malware with the EvilVideo vulnerability.
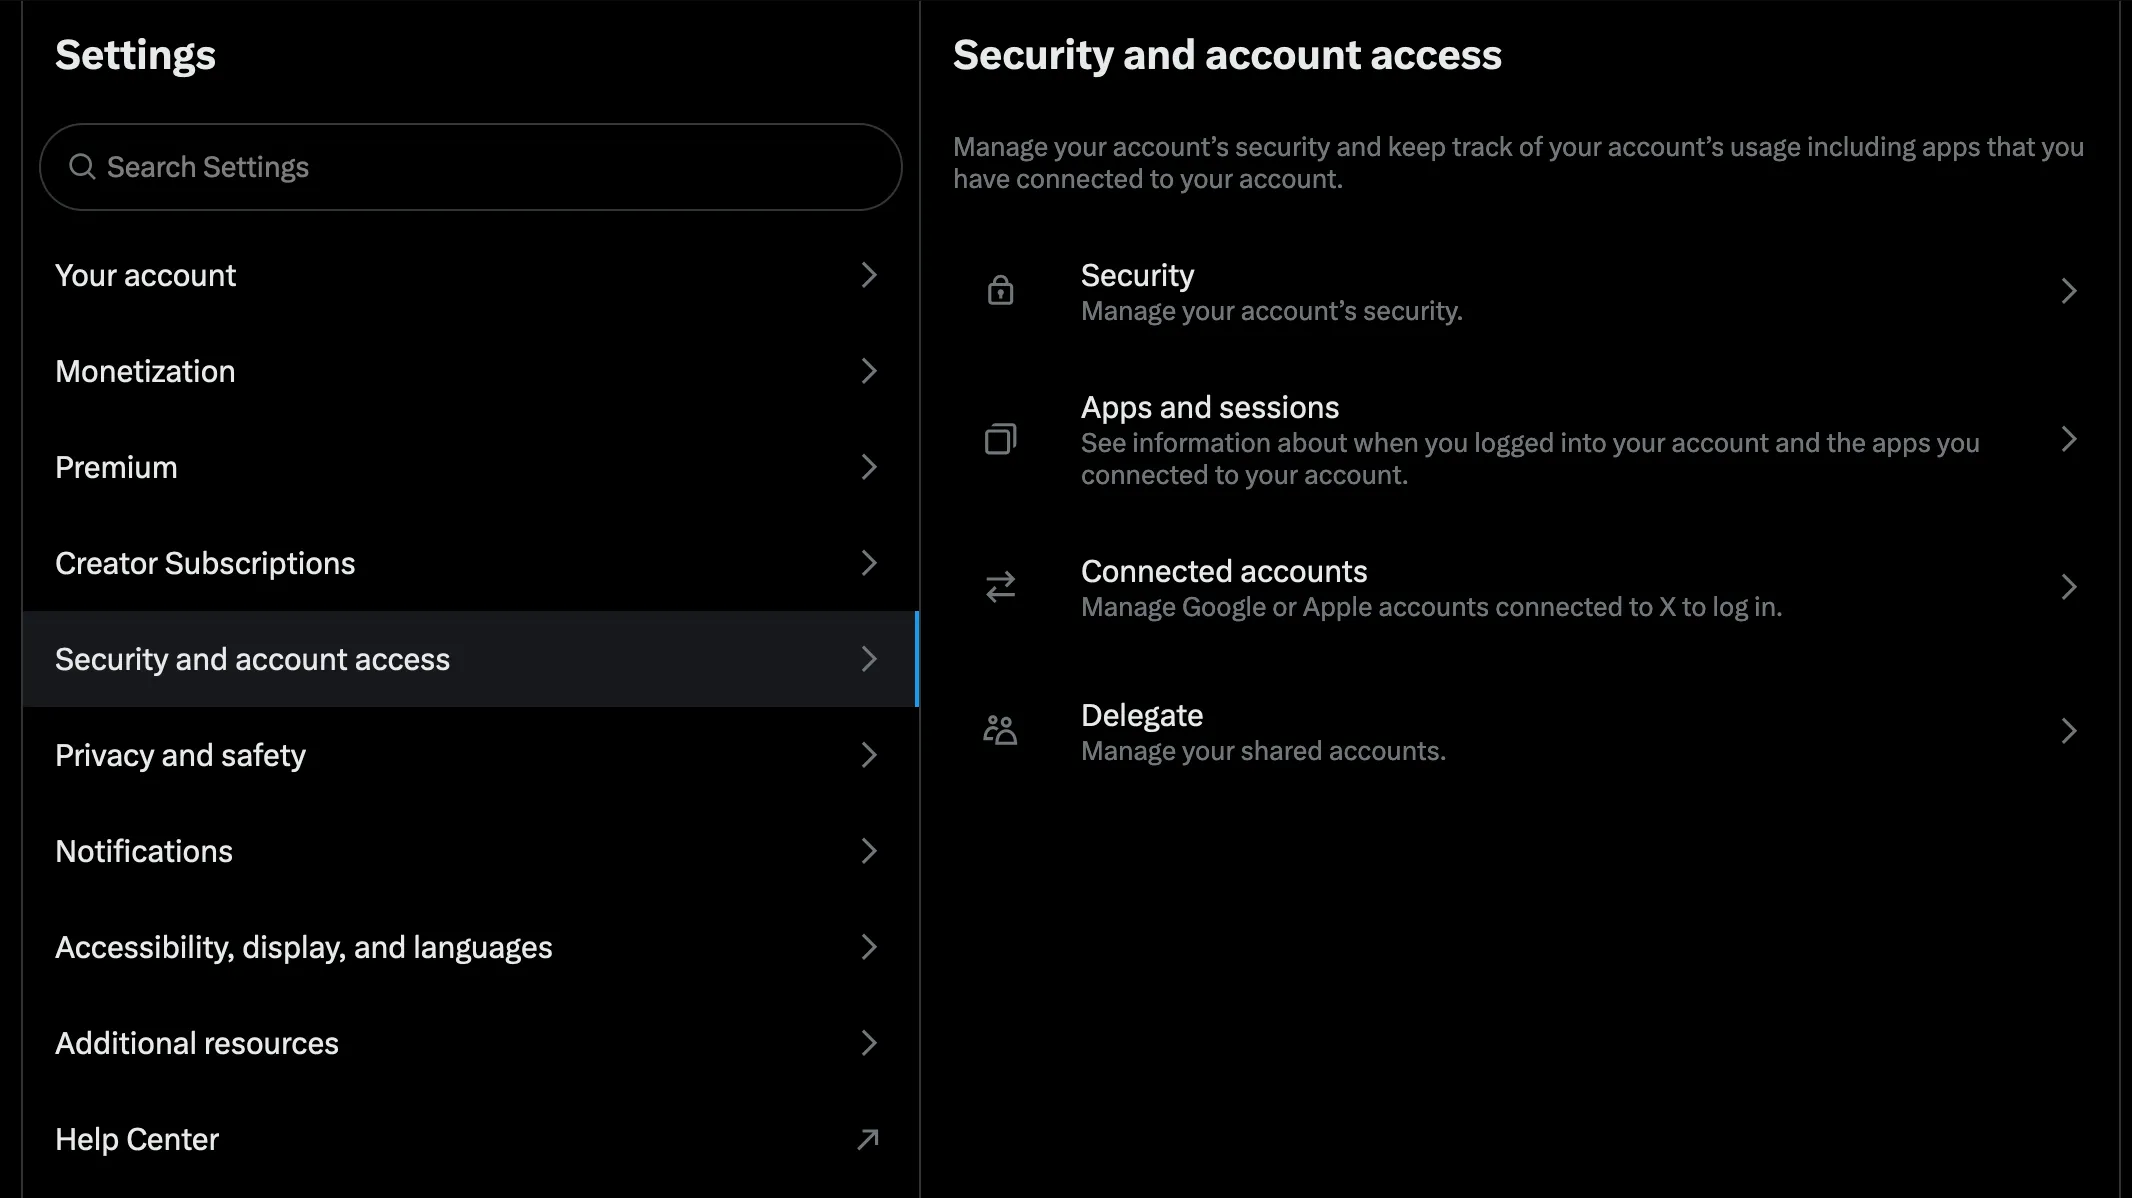
Twitter doesn’t enable 2FA by default so you’ll have to manually set that up. Head to settings then “Security and account access.” Then “Security”.
Head to two-factor authentication then add Authenticator app and security key if you have a YubiKey. Store your backup code in your password manager or in a physical notebook.
If you are in a position where it would not make sense to have people contact you unsolicited (i.e., you are not a dev, BD, salesperson, VC investor et cetera) then consider disabling DMs to prevent receiving potential scam and phishing attempts.
If you share an account with anyone else in any capacity, avoid sharing passwords as compromise on their part will be disastrous. Instead, delegate the account to them. This is particularly useful when needing to grant organization social access to community managers, salespeople and other teammates. Functionality is limited to DMs, posting and creating lists. You can also revoke access at any time in case of compromise.
Find the setting under “Security and account access.”
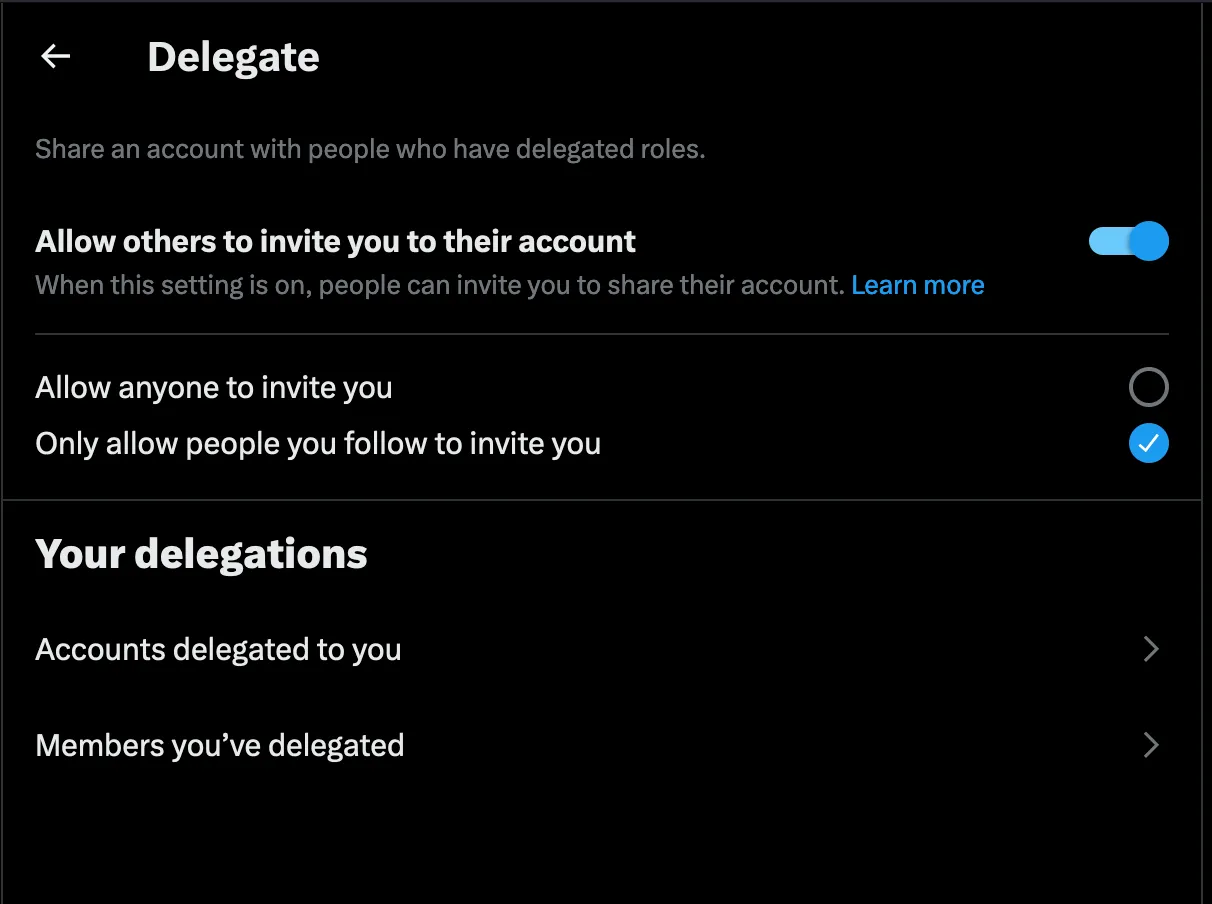
Make sure to allow others to invite you if you’re a delegatee. You can add delegated under “Members you’ve delegated.”
Discord
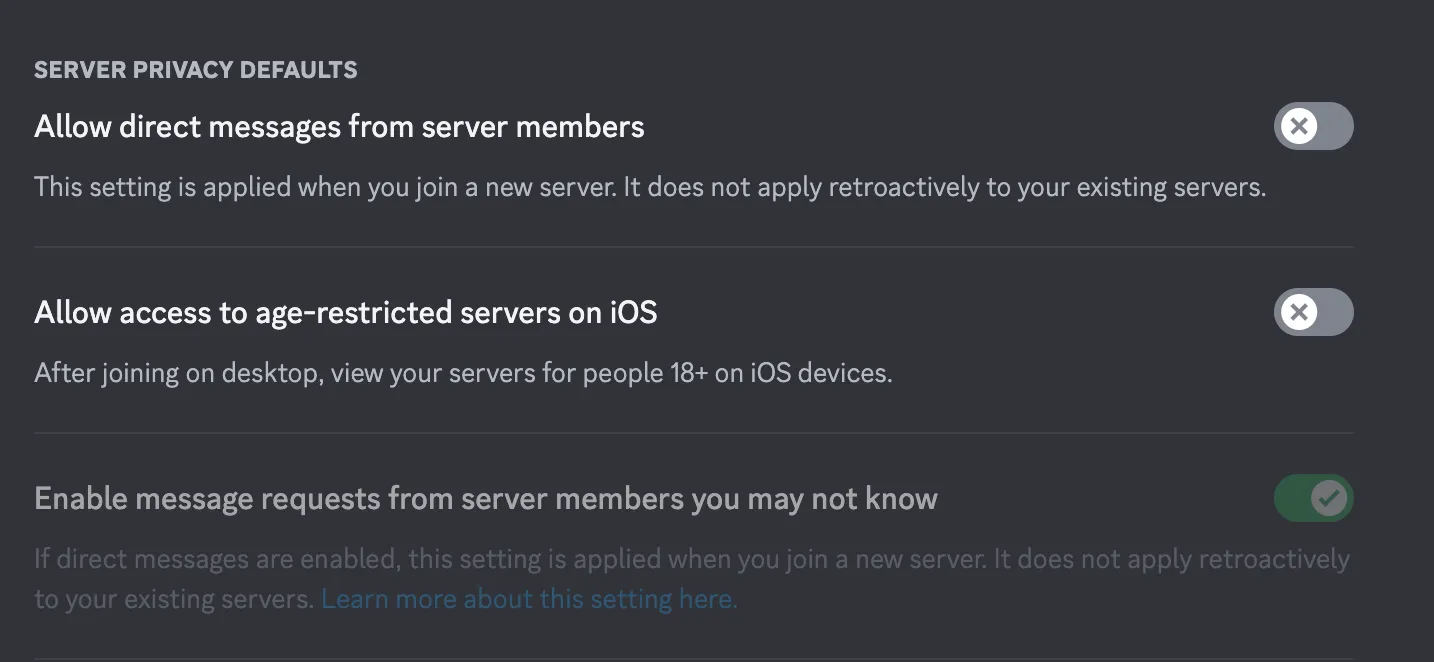
If you’re interacting with the crypto community in any facet on Discord, it’s prudent to disable DMs from people not in your friends list to avoid spam and poor attempts at phishing. Head to ‘Privacy and Safety’ in settings and the option should be under “Server Privacy Defaults:”
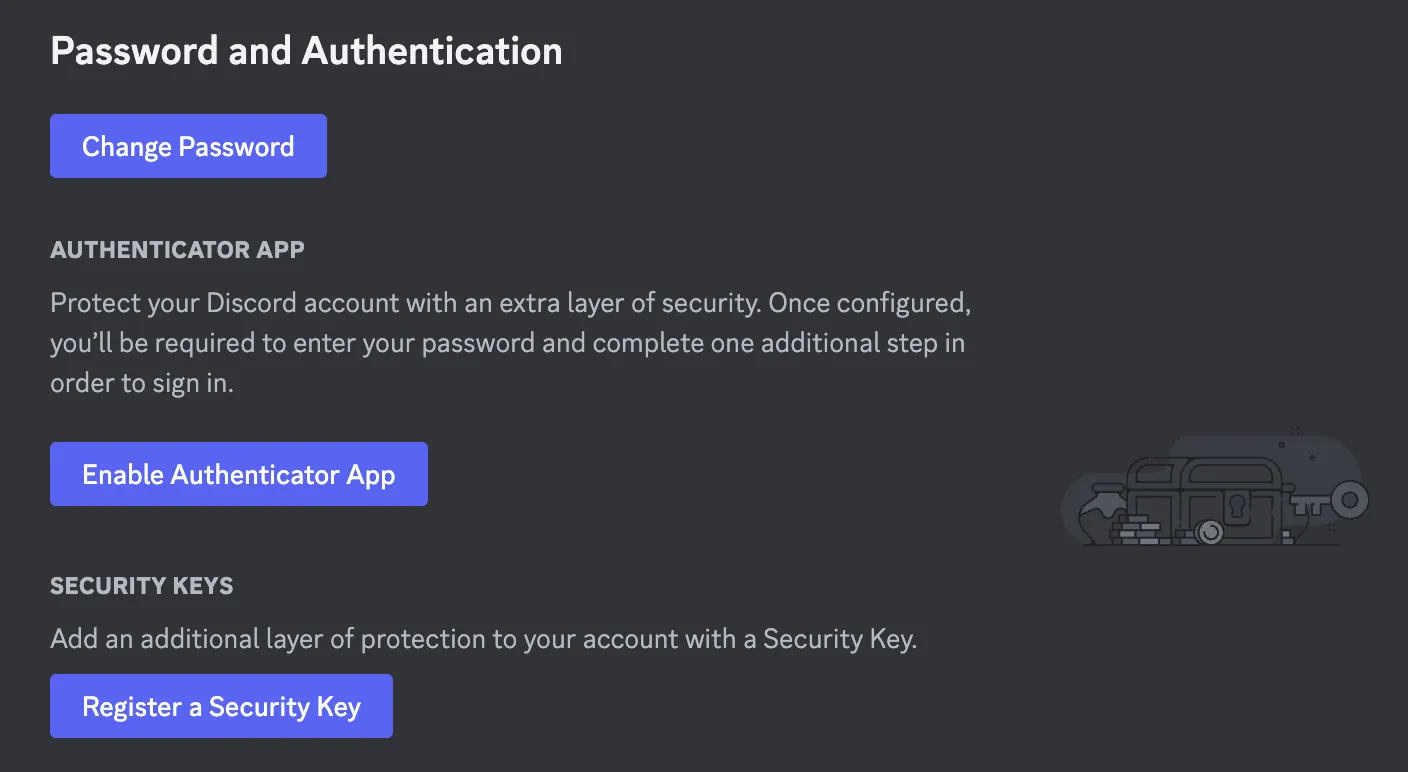
Discord also doesn’t have 2FA set up automatically so you’ll have to manually enable this. Head to “My Account” and enable your choice of authenticator or security, ideally both.
Signal
Head to Privacy and restrict who can view your phone number.
Not everyone should have access to your phone number and this applies to your email address as well. The reasoning is to reduce the likelihood that you receive spam in general and phishing attempts when your email ends up in a data breach or sold online by data brokers. You should not be pasting your real email just anywhere, especially for temporary communications or newsletters. Additionally, think of it like a second password. Not only will an attacker need to guess your password when attempting to login but also which alias you used.
Pro tip: You can check if your email’s already been in one at haveibeenpwned.com. Make sure to change any passwords involved with the affected account(s).
The average person nowadays has >20 accounts and it’s not feasible to have that many unique emails for each account you setup.
The solution is email aliasing. Email aliasing is basically a service that presents an external facing email address different to your own that forwards any mail received to your actual address (i.e., say your real email is [email protected], you could have an alias [email protected]).
Think of it like a proxy. It’s fully functional and you’re able to use it to set up accounts for anything.
I recommend AnonAddy for this as you can set this up with your custom domain and optionally self-host. ProtonMail also has this feature available as part of their premium offering however it’s restricted to them as an email provider.
An additional advantage with this is you can easily migrate to a new “main” email by simply changing the receiving address. If the spam and phishing attempts off one alias becomes too much, you can deactivate forwarding.
The default settings for most email providers are solid as is so we won’t say anything on that end.
Note: ProtonMail offers a feature named Sentinel that alerts you and their dedicated security team to any suspicious logins, be sure to enable that.
Miscellaneous advice
- Keep your devices and all applications up to date.
- Don’t share the following details publicly:
- Your phone number.
- Your operating system of choice (if anything other than Windows). This prevents an attacker from including malware compiled for your specific architecture and OS in any messages and instead sticking to their default assumption.
- Your phone’s brand. Make sure to crop any screenshots you send given that could be a way to identify the manufacturer based on UI. This also applies to messages such as “Sent from my iPhone” in email.
- Your personal email. Share an email alias instead.
- The amount of crypto or fiat you hold. IRL attacks are increasingly common.
- Your physical address.
- Do not take a picture of your recovery phrase and keep it on iCloud or whatever. That is just asking to get rekt. Do not keep it unencrypted either.
- When storing secrets on physical paper such as secret recovery phrases or password manager master passwords, keep them on acid-free, laminated paper in a fire-proof lockbox. Additionally, keep another backup in the bank.
Conclusion and acknowledgements
We’ve stuck to the general basics here, covering only topics that apply to most individuals and would like to reiterate that there are additional factors to consider when applying OPSEC to an organization like G-suite policies and not to mention any custom vendor software that may be in use.
If you’d like help beefing up your organization’s OPSEC and incident response, alongside other security work such as fuzzing and audits, please feel free to contact us.
Additionally, we’d like to thank the following individuals for their feedback and suggestions on this guide:
- pcaversaccio particularly for proof-reading the article and suggesting the use of Windows Sandbox, Isolated Browsing, ProtonPass and ProtonVPN. The discussion on segmentation of VMs and separate workstations was appreciated!
- Taylor Monahan for general suggestions on signing transactions.
We’d also like to recognise the work of the following as inspirations for this guide: